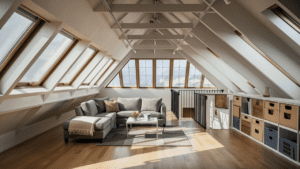
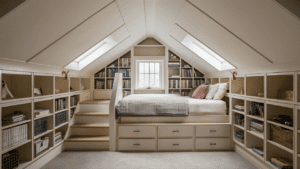
Loft boarding is a practical solution for homeowners looking to maximize their living space.
As an interior designer, I understand that transforming an underutilized loft into a functional area can significantly enhance the overall value and comfort of a home.
In this article, I will delve deeper into five crucial aspects of loft boarding, providing insights that go beyond the basics to help you achieve a well-designed and safe loft space.

1. Can You Walk on Loft Boards? Ensuring Safety and Durability
When considering loft boarding, one of the foremost concerns is safety. The thickness of the boards is paramount. For a loft to be safe for walking, the boards should ideally be at least 18mm thick. Thinner boards can compromise safety, as stepping on them may lead to a fall in the insulation below, which can cause skin irritations and potential injury.
To enhance safety, it is advisable to distribute your weight across the joists rather than the boards themselves. This technique minimizes the risk of damaging the boards and ensures a more stable walking surface.
Moreover, if you envision your loft as more than just a storage area—perhaps as a cozy reading nook, a home office, or even a guest bedroom—consider using high-quality wood instead of standard loft boards. This not only provides a sturdier foundation for furniture but also elevates the aesthetic appeal of the space.
2. Is It Okay to Board Over Loft Insulation? Maximizing Efficiency
Boarding over insulation is not only acceptable but highly recommended to optimize the thermal performance of your loft. Proper insulation is essential for maintaining a comfortable home environment and reducing energy costs. By boarding over insulation, you create a flat, stable surface that allows for organized storage while enhancing the insulation’s effectiveness.
When boarding over insulation, ensure that the insulation material remains undisturbed. Compressing insulation can reduce its effectiveness by up to 50%, leading to increased energy loss. Therefore, maintaining airflow between the insulation and the boards is crucial. This can be achieved by using loft legs, which elevate the boards and allow for proper ventilation.
3. What Is the Most Cost-Effective Way to Board a Loft? A Step-by-Step Guide
Boarding a loft can be a budget-friendly project if approached methodically. For a typical loft of approximately 150 square meters, you can expect to spend around $1,000. Here’s a comprehensive guide to keep costs down while ensuring quality:
- Declutter the Space: Begin by removing all items from the loft. This not only provides a clean slate but also allows you to assess the condition of the space.
- Insulate Properly: If you live in a colder climate, insulation is essential. Use cost-effective materials like rock wool or fiberglass, which are both efficient and budget-friendly.
- Install Loft Legs: These are crucial for creating space between the insulation and the boards, promoting airflow, and preventing compression of the insulation.
- Fit the Boards: Choose boards that are 180mm thick for optimal weight distribution. Use a drill to secure the boards to the loft legs, ensuring they are firmly in place.
- Add Finishing Touches: Incorporate lighting and shelving to enhance functionality. Proper lighting is essential for navigating the loft safely, while shelves can maximize storage efficiency.


4. How Long Does It Take to Board a Loft? Planning Your Project
The time required to board a loft can vary based on several factors, including the size of the loft and your level of experience. Generally, for a 1,000-square-foot loft, you can expect the entire process to take approximately 6 to 7 hours. This includes:
- 3-4 hours for cleaning and insulating: Thoroughly clean the loft and install insulation materials.
- 2-3 hours for boarding: Carefully install the loft boards, ensuring they are secure and stable.
To streamline the process, consider using smaller boards. While larger boards may seem more economical, they can be cumbersome to maneuver through standard loft hatches. Smaller boards are easier to handle and can save you time during installation.
5. Do I Need Permission to Board My Loft? Understanding Regulations
In most cases, you do not need formal permission to board your loft, as this typically does not alter the structural integrity of your home. However, it is essential to familiarize yourself with local regulations, especially if you live in a country with strict building codes. Some regions may have specific guidelines regarding loft conversions or alterations to existing structures.
When planning your loft boarding project, it’s wise to consult local building authorities or a professional designer to ensure compliance with any applicable regulations. This proactive approach can help you avoid potential issues down the line.
6. How can I ensure my loft boards are securely installed?
Ensuring Secure Loft Board Installation: To securely install your loft boards and create a safe, stable storage space, follow these key steps:
- Use the Right Thickness of Boards: The minimum recommended thickness for loft boards is 18mm. Boards thinner than this may not be sturdy enough to walk on or support stored items.
- Stagger the Board Joints: Lay the boards in a staggered pattern so the joints don’t line up. This creates a stronger, more stable surface. Cut some boards to size as needed to maintain the staggered layout.
- Install Loft Legs: Screw loft legs directly into the ceiling joists or trusses. These legs elevate the boards above the insulation, preventing compression. Space the legs to match the board joints.
- Secure the Boards to the Legs: Use screws to fasten the boards to the loft legs. Drill pilot holes along the board edges, aligning with the leg positions below. Drive in 2-3 screws per leg to lock the boards firmly in place.
- Consider Insulation Depth: If your loft has more than 270mm of insulation, you may need extra-long loft legs to raise the boards sufficiently. Avoid compressing the insulation, as this reduces its effectiveness.
By following these steps and using the right materials, you can create a sturdy, secure loft storage space that is safe to access and use. Take the time to prepare the area and install the components properly for the best results.
7. What are the best tools for installing loft boards?
To ensure a successful installation of loft boards, having the right tools is essential. Here’s a list of the best tools you will need for the job:
Essential Tools for Installing Loft Boards
- Tape Measure
Accurate measurements are crucial for cutting boards to the correct size and ensuring a proper fit in your loft. - Pencil
Use a pencil to mark measurements on the boards before cutting. Clear markings help ensure precision. - Handsaw or Circular Saw
A handsaw is suitable for cutting loft boards to length, while a circular saw can provide faster, more precise cuts. For occasional use, a jigsaw can also be effective for smaller cuts. - Drill
A power drill is essential for drilling pilot holes and driving screws into the loft boards. Ensure you have the appropriate drill bits for wood. - Screws
Use wood screws to secure the loft boards to the loft legs or joists. Typically, 2-3 screws per joint are recommended for stability. - Loft Legs
These supports elevate the boards above the insulation, preventing compression and maintaining insulation effectiveness. They are crucial for creating a stable loft floor. - Protective Gear
Safety should be a priority. Wear gloves, goggles, and a dust mask to protect yourself from dust and debris while working in the loft. - Hammer
A hammer may be needed for minor adjustments or to tap boards into place. - Level
A level ensures that your boards are installed evenly, which is important for both aesthetics and functionality. - Knee Pads
Working in a loft can be uncomfortable, so knee pads can provide extra comfort while kneeling on the floor.
Additional Tips
- Lighting: If your loft lacks sufficient lighting, consider using a portable work light to illuminate the area while you work.
- Temporary Work Platform: Use a piece of board as a temporary platform across the joists to provide a stable working surface.
By gathering these tools and preparing adequately, you can ensure a secure and efficient installation of your loft boards, transforming your loft into a functional storage space.
8. What are the Essential Safety Precautions when Installing Loft Boards?
When installing loft boards, safety should be your top priority. Here are essential safety precautions to consider during the installation process:
1. Inspect the Joists
Before beginning, ensure that the joists are in good condition. Check for any signs of damage, such as cracks or rot. If the joists are compromised, repair or replace them before proceeding with the boarding process to avoid structural failures.
2. Use Proper Personal Protective Equipment (PPE)
Wear appropriate PPE to protect yourself from dust and potential hazards:
- Dust Mask: To avoid inhaling insulation particles and dust.
- Gloves: To protect your hands from sharp edges and irritants.
- Safety Goggles: To shield your eyes from dust and debris.
3. Ensure Adequate Lighting
Good visibility is crucial when working in a loft. If the area is poorly lit, use portable work lights to illuminate the space, reducing the risk of accidents.
4. Create a Safe Working Platform
Use a temporary work platform made from a board laid across the joists to provide a stable surface while you install the loft boards. This prevents you from stepping directly onto the joists, which can be unsafe, especially if they are exposed.
5. Avoid Overloading
Be mindful of the weight limits of your loft. Newer homes can typically support a maximum of 25 kg per square meter. If your loft is older, consult a structural engineer to determine the safe load capacity before storing items or walking on the boards.
6. Use Loft Legs
Install loft legs to raise the boards above the insulation. This prevents compression of the insulation, which can reduce its effectiveness by over 50%. Loft legs also provide a stable base for the boards, ensuring they are securely supported.
7. Secure the Boards Properly
Use countersunk screws to fasten the loft boards to the joists or loft legs. Drill pilot holes to prevent splitting the wood, and ensure that the screws are flush with the board surface to avoid tripping hazards.
8. Maintain Clear Access
Ensure that the loft hatch and access points are clear of obstructions. A good-quality loft ladder should be used to access the loft safely. Avoid using makeshift ladders or unstable surfaces.
9. Be Cautious with Insulation
Do not remove or cut holes in insulation to make room for loft boards. This can compromise the thermal performance of your home. Instead, ensure that insulation is properly installed and not compressed.
10. Plan for Ventilation
If your loft has electrical wiring or plumbing, ensure that the installation does not obstruct ventilation or access to these systems. Proper airflow is essential to prevent moisture buildup and potential damage.
By adhering to these safety precautions, you can ensure a secure and efficient installation of your loft boards, creating a safe and functional storage space.
Final Thoughts: Transforming Your Loft into a Functional Space
Loft boarding is an excellent way to enhance your home’s functionality and aesthetic appeal. By following the guidelines outlined above, you can create a safe, organized, and inviting loft space that meets your storage needs and complements your lifestyle.
As you work on this project, remember that thoughtful planning and execution are key. Whether you envision a serene reading corner, a vibrant home office, or simply a well-organized storage area, your loft can be transformed into a valuable asset for your home.
Feel free to share this guide with friends and family who may also be considering loft boarding, and inspire them to unlock the potential of their own spaces!


